2012 0011 0024

pythonbrew+opencv+debian

There are a number of ways to go about building a modern development environment for scientific computing and computer vision in python. If you’re used to developing on bleeding-edge, however, the latest debian stable makes it a chore to get started with the latest and greatest. It ships with python2.6 instead of 2.7, and opencv is notoriously out of date in a number of distributions, debian included. I typically use Arch, but the server-class machines I have access to were running debian, so I had to bootstrap my setup into this environment.

Challenge accepted.

Thankfully, pythonbrew (or pythonz) comes to the rescue by making it easy to handle multiple pythons for a single account (without having to install them system-wide) as well as providing wrappers around virtualenv. However, not everything is rosy. The python you choose has to be built with shared libraries if you want to install opencv later:

pythonbrew install --configure="--enable-shared" 2.7.3

After this, you can bootstrap a virtualenv as usual

pythonbrew venv init
pythonbrew venv create debian
pythonbrew venv use debian

and install any requisite stuff you might need (minimum numpy/scipy)

pip install numpy
pip install scipy
pip install pymorph
pip install matplotlib
pip install distutils

Unfortunately, there’s no such pip package for opencv. Thankfully, the debian installation guide isn’t too far out of date, and many of the listed packages to apt-get are still relevant.

wget http://downloads.sourceforge.net/project/opencvlibrary/opencv-unix/2.4.3/OpenCV-2.4.3.tar.bz2
tar xjvf OpenCV-2.4.3.tar.bz2
cd OpenCV-2.4.3
mkdir {build,release}
cd release

At this point, we need to delve into where pythonbrew puts all its related files to configure opencv correctly. First, your installed python will be available in one of two places (here python 2.7.3 is used as an example):

~/.pythonbrew/venvs/Python-2.7.3/{venv-name}/bin/python
~/.pythonbrew/pythons/Python-2.7.3/bin/python

All virtualenvs based on a particular version of python will have a copy of that python binary for use in their own isolated environment. In addition, the virtualenv has an include directory that you should use, since all your additional packages installed into the virtualenv will place their headers in this directory:

~/.pythonbrew/venvs/Python-2.7.3/{venv-name}/include/python2.7

The hitch, however, is that the virtualenv does not have a copy/symlink of the shared library we specifically built when first compiling python using pythonbrew, unlike a typical native python install. This means that cmake’s approach to locate this library will fail. Thus we must point opencv to this

~/.pythonbrew/pythons/Python-2.7.3/lib/libpython2.7.so

for it to build corectly.

Speaking of cmake, there is a bug in the cmake included in debian that prevents it from building opencv correctly. I was lazy and simply grabbed a binary of the latest cmake,

wget http://www.cmake.org/files/v2.8/cmake-2.8.9-Linux-i386.tar.gz

which worked on my debian build, but it’s better to compile it if you plan to continue using it for more than a one-off build.

Finally, understanding opencv’s cmake flags is important for getting everything stitched together:

PYTHON_EXECUTABLE=~/.pythonbrew/venvs/Python-2.7.3/{venv-name}/bin/python
PYTHON_INCLUDE_DIR=~/.pythonbrew/venvs/Python-2.7.3/debian/include/python2.7
PYTHON_LIBRARY=~/.pythonbrew/pythons/Python-2.7.3/lib/libpython2.7.so

Additionally, if you find that numpy isn’t autodetected, you can specify

PYTHON_NUMPY_INCLUDE_DIR=~/.pythonbrew/venvs/Python-2.7.3/debian/lib/python2.7/site-packages/numpy/core/include

You can also specify your virtualenv path to install the python libraries

PYTHON_PACKAGES_PATH=~/.pythonbrew/venvs/Python-2.7.3/{venv-name}/lib/python2.7/site-packages

or just symlink/copy the resulting cv2.so and cv.py files there later.

Putting it all together, I used this command to generate the makefile which compiles correctly against pythonbrew’s python (where debian is my virtualenv name):

~/cmake-2.8.9-Linux-i386/bin/cmake \
-D CMAKE_INSTALL_PREFIX=../build \
-D BUILD_NEW_PYTHON_SUPPORT=ON \
-D BUILD_PYTHON_SUPPORT=ON \
-D BUILD_EXAMPLES=OFF \
-D PYTHON_EXECUTABLE=~/.pythonbrew/venvs/Python-2.7.3/debian/bin/python \
-D PYTHON_INCLUDE_DIR=~/.pythonbrew/venvs/Python-2.7.3/debian/include/python2.7 \
-D PYTHON_LIBRARY=~/.pythonbrew/pythons/Python-2.7.3/lib/libpython2.7.so \
-D PYTHON_NUMPY_INCLUDE_DIR=~/.pythonbrew/venvs/Python-2.7.3/debian/lib/python2.7/site-packages/numpy/core/include \
-D PYTHON_PACKAGES_PATH=~/.pythonbrew/venvs/Python-2.7.3/debian/lib/python2.7/site-packages \
../
make
make install

Depending on what you’re doing, there may be other tricks with LD_LIBRARY_PATH to make specific things work, but your pythonbrewed python should be primed to access opencv from here.
2012 0009 0015

Anatomy of a Chrome Extension

I launched nonpartisan.me a few weeks back, which exists primarily in the form of a Google Chrome extension (there’s a Firefox add-on too). Since I released it with all of the source, this makes it a great time to dissect the (very simple) code. As you will notice from the site and the small bit of press it picked up, nonpartisan.me has a very simple premise: filter out political keywords from the various newsfeeds (specifically Facebook, Twitter, and Google+).

This was my first attempt at a Chrome extension, and it’s surprisingly straightforward. All such extensions require a manifest.json, which looks like this for nonpartisan.me:

{
    "name"             : "nonpartisan.me",
    "version"          : "0.2.1",
    "manifest_version" : 2,
    "description"      : "Removes partisanship from your news feeds",
    "icons"            : { "16": "icon16.png",
                           "48": "icon48.png",
                          "128": "icon128.png" },
    "homepage_url"     : "https://nonpartisan.me",
    "page_action"      : {"default_icon" : "icon48.png",
                          "default_title": "nonpartisan'ed" },
    "permissions"      : ["tabs",
                          "https://www.facebook.com/",
                          "https://www.twitter.com/",
                          "https://plus.google.com/"],
    "options_page"     : "options.html",
    "content_scripts"  : [
    {
        "matches": ["*://*.facebook.com/*"],
        "js"     : ["jquery.js","common.js","fb.js","nonpartisan.js"],
        "run_at" : "document_end"
    },
    {
        "matches": ["*://twitter.com/*"],
        "js"     : ["jquery.js","common.js","tw.js","nonpartisan.js"],
        "run_at" : "document_end"
    },
    {
        "matches": ["*://plus.google.com/*"],
        "js"     : ["jquery.js","common.js","gp.js","nonpartisan.js"],
        "run_at" : "document_end"
    }],
    "background": {"scripts"   : ["common.js","background.js"],
                   "persistent": false }
}

The real meat here is content_scripts, which lists the javascript we wish to trigger after a page is loaded, greasemonkey-style. A particularly nice feature of content scripts are that they work in an isolated environment separate from any javascript that the page itself may include. Thus we can add jquery to the list of javascript that is run without fear of clashing with a page’s global namespace.

You can think of every element in the "js" array as a separate <script> tag in an HTML page, so the files are loaded in the given order, all into a single namespace. Rather clumsily, I chose to simply put a callback module (which is called plugin here) in the individual fb.js, tw.js, and gp.js files which is then used by the core component, nonpartisan.js, as a simple means of avoiding any hard-coded per-site values in the actual filtering code.

With this, and the pseudo-regex "matches" field that specifies which pages trigger the content script, we can run arbitrary code on websites we specify. For nonpartisan.me, the filtering code looks like this:

"use strict";
var nonpartisan = function(plugin) {

    function nonpartisan (watch,parent,keywords) {
        function kill (parent,removeList){
            $(parent).each(function () {
                var el = $(this);
                if(el.css('display') !== 'none') {
                    el.find('*').each(function () {
                        var toCheck = $(this).text().toLowerCase();
                        if(toCheck.length > 0 &&
                           (removeList.some(function (value) {
                               return (toCheck.search("\\b"+value.toLowerCase()+"\\b") >=0);
                           }))
                          ) {
                            el.css({'display':'none'});
                            return false;
                        }
                    });
                }
            });
        }

        if($(parent) && $(watch)) {
            var numChildren = $(parent).children().length;
            setInterval(function () {
                var newNumChildren = $(parent).children().length;
                if(numChildren !== newNumChildren) {
                    kill(parent,keywords);
                    numChildren = newNumChildren;
                }
            },
                        500);
            kill(parent,keywords);
        }
    }

    // get parameters from plugin and trigger nonpartisan() here...

}(plugin);

The first chunk–the kill function–works as advertised: given a parent element and a set of keywords, the function iterates over every child element and determines if any of the nested elements within (i.e. el.find('*')) contains any of the keywords. Instead of deleting DOM nodes, which may break the page’s own javascript (I discovered this the hard way), it’s easier to instead call el.css({'display':'none}); to simply hide unwanted elements. For efficiency, the forEach terminates as soon any any nested child returns a match, potentially saving a small amount of needless searching.

The second chunk starts a timer (if indeed the parent is even found on the current page) that checks if the number of children of the parent element has changed and, if so, re-triggers the filtering process to determine if there are any new children to be hidden. This helps handle AJAX-driven sites, like the “infinite scrolling” facebook newsfeed, which may mutate the DOM at any time. Both of these functions are wrapped up into another easy-to-call function inside of the high-level nonpartisan module.

And that really is all there is to a typical greasemonkey-like Chrome extension, but that’s certainly not the end of what a complete and helpful extension can provide. The trickier bit is persisting configuration options. The downside of sandboxing content scripts is that they exist in a transient execution context, meaning there’s no localStorage to persist program options. The details of the plumbing used to kick-off the process and handle options were omitted from the above snippet, so we’ll dig more into this now to illustrate how to handle persistent options.

Chrome provides a nice solution to the problem of not having localStorage available to content scripts by providing a background script which does have its own localStorage, which it can transmit to a content script via the chrome.extension.onMessage listener. We can then fill in the omitted component of the above snippet with:

chrome.extension.sendMessage({method: "config"}, function (response) {
    if(!response.sites[plugin.site]) return;
    var l = response.filter;
    if(l && l.length>0) {
        plugin.cb(l,nonpartisan);
    }
    // get default values from common.js
    else {
        l = [];
        for(var index in choices) {
            l = l.concat(choices[index]);
        }
        plugin.cb(l,nonpartisan);
    }
});

This sends a message, requesting "config" from the background.js script, which returns, among other things, the list of keywords we wish to filter. This list was saved in localStorage in background.js’s execution context. Recall that plugin is the module that specifies the particular settings for the page being filtered. Thus we pass along the list of words to filter and the nonpartisan() callback function to the plugin module, and it subsequently executes nonpartisan() on the appropriate elements on the DOM. The background.js file used in nonpartisan.me is a bit more involved, but it nonetheless essentially acts as a broker, converting Chrome’s internal message-passing API calls to localStorage requests.

Of course, there’s only so much utility to be gained from localStorage without supplying the user with the ability to configure the various options that may be saved in therein. This is done by a typical html page, specified by "options_page". Since there’s not much magic there–it’s just a plain html page with enough javascript to persist the settings–I will omit the gory details, which you can poke around yourself in the repository, if you’re so inclined.

So that’s an extension. Writing the above was literally a matter of minutes and some quality time with the Chrome API specifications. As is always the case (especially when I’m working outside of my area of expertise, say with making the amateurish logo), the real work is doing the little bits of spit-and-polish to handle the various configuration options, throwing together the webpage, creating the icons and promotional images for the Chrome Web Store, etc. But it’s still good to know that the Chrome team has made the extension-building process as simple and well documented as they have.

2012 0008 0011

Poor Man's LDAP

In addition to being a researcher and backend web developer, I’ve also worn the system administrator hat for a number of years. While the likes of LDAP, Active Directory, NIS, and their ilk can work quite well for managing medium-to-large networks, I’ve more often been tasked with managing small-scale (< 20 machines) heterogeneous Linux networks, where deploying LDAP with full Kerberos authentication would be overkill. Typical requirements I’ve encountered in small lab settings are simple user account and home folder sharing, and (relatively) similar package installations.

With this in mind, I did what probably every sysadmin in the same situation would do: scrape together a simple set of scripts to handle basic file synchronization for me. Specifically, I noticed two prevalent requirements among config files being synced:

  • machines and/or distros have a common header or footer that must be included (e.g., a list of system users in /etc/passwd), and

  • specific machines (e.g., servers) shouldn’t have some files synced with the rest of the machines (e.g., file shares might be different on a server).

Thus, Poor Man's LDAP was born.

While nothing more than a collection of scripts–no different than what many other sysadmins have implemented, in all likelihood–they will hopefully be of use for those who, like me, are graduate students or otherwise non-full-time sysadmins that don’t have time to do things the “right” way.

I’m dogfooding pmldap on my research lab’s network, where we (currently) have 5 Fedora machines (various versions between 10 and 16) and 5 Debian machines (all on stable). Since my recent patch, pmldap now supports groups, which are useful for running yum commands only on the Fedora machines and apt commands on only the Debian boxes. Files being synchronized include: fstab, group, hosts, hosts.allow, hosts.deny, passwd, shadow, and sudoers.

Also in the repo are a few convenience tools that I’ve found useful:

  • authorize-machine bootstraps a machine by setting up ssh keys

  • setup bootstraps config files from a remote machine so they can be merged with the desired additions

  • cmd runs an arbitrary command on all machines (or a particular group of machines)

  • useradd is a feature-incomplete reimplementation of the native useradd command that works on local passwd, shadow, and group files to add new users that can later be synchronized across the network

Since I hadn’t stumbled across something of this scope to fit the small-scale-network use case, I’m hopeful that pmldap will be of use to anyone in a similar situation.

You’ll find it on gitub here.

2012 0007 0029

Git Dotfile Versioning Across Systems

For users of unix-like operating systems, treating your dotfiles like real code and keeping them in a repository is a supremely good idea. While there are a myriad of ways to go about this, the typical (albeit destructive) way to do this is by symlinking files in the repository to the home folder:

#!/bin/bash
DEST=$HOME
FILES=$(git ls-files | grep -v .gitignore | grep -v ^$(basename $0)$)
for f in $FILES ; do
    [ -n "$(dirname $f)" \
      -a "$(dirname $f)" != "." \
      -a ! -d "$DEST/$(dirname $f)" ] \
    && mkdir -p $DEST/$(dirname $f)
    ln -sf $(pwd)/$f $DEST/$f
done

I specifically chose to have FILES populated using git ls-files to prevent any unversioned files from sneaking into the home folder, additionally filtering out both the .gitignore file, and the current script name (so it can be safely checked in as well). After this, we loop over the files, creating appropriate directories if they do not exist, effectively symlinking the entire repo to the home folder, clobbering any files that are already there (without asking!).

While most dotfiles won’t care what system they are on, certain scripts or settings may be machine-dependent. To accommodate this, I include a ~/.sys/`hostname`/ folder for every machine with system-specific files. Then, when symlinking, we favor files listed in the ~/.sys/`hostname`/ folder rather than the top-level files:

if [ -e ".sys/$(hostname)/$f" ] ; then
    ln -sf $(pwd)/.sys/$(hostname)/$f $DEST/$f
else
    ln -sf $(pwd)/$f $DEST/$f
fi

Thus, for example, given machine1 and machine2 and a repo in the ~/dotfiles directory with these files:

~/dotfiles/.gitconfig
~/dotfiles/.sys/machine2/.gitconfig

machine1 will get a symlink from

~/dotfiles/.gitconfig

to ~/.gitconfig, while machine2 will instead get a symlink from

~/dotfiles/.sys/machine2/.gitconfig

to ~/.gitconfig. This variant of the script doesn’t explicitly ignore the .sys folder itself so it will be added to the home folder as well. Which, as an aside, can be useful by including something like this

[ -d ~/.sys/`hostname`/bin ] && export PATH=~/.sys/`hostname`/bin:$PATH

in the .bashrc file such that specific scripts will be on the PATH for individual machines.

So the final script, with a bit of input checking, looks like this:

#!/bin/bash
set -e
EXPECTED_ARGS=1
if [ $# -lt $EXPECTED_ARGS ]
then
    echo "Usage: `basename $0` directory"
    echo "WILL clobber existing files without permission: Use at your own risk"
    exit 65
fi

DEST=$1
FILES=$(git ls-files | grep -v .gitignore | grep -v ^$(basename $0)$)

for f in $FILES ; do
    echo $f
    if [ -n "$(dirname $f)" -a "$(dirname $f)" != "." -a ! -d "$DEST/$(dirname $f)" ] ; then
        mkdir -p $DEST/$(dirname $f)
    fi

    if [ -e ".sys/$(hostname)/$f" ] ; then
        ln -sf $(pwd)/.sys/$(hostname)/$f $DEST/$f
    else
        ln -sf $(pwd)/$f $DEST/$f
    fi
done

By making DEST a command-line parameter, a dry-run can be done by simply giving it an empty folder. There’s no issue doing this inside the repo’s working tree, as only checked-in files will be transferred to the target directory:

> mkdir tmp
> ./deploy tmp/

Doing this, the contents of the tmp/ directory can be verified with ls -al to see exactly what the script will do to your home folder. Once satisfied, it can be run again with

> ./deploy ~

to symlink all the files to the home folder proper.

Feel free to grab an up-to-date version of this script from my own dotfile repo here.

2012 0007 0008

Beating Interview Problems to Death with Parallel Haskell

Like anyone for whom graduation is becoming more immanent, I’ve been taking a look at the latest trends in the typical technology interview process. While many of the Fizz Buzzes being thrown around aren’t exactly exciting highlights of problem solving… well, you can always just beat them to death.

The Run Length Encoding algorithm is a nice, compact, and slightly real-world interview problem that has been making the rounds for years now. The basic idea being that “runs” of data, e.g. aaaabbbbbbb, are compressed into tuples, e.g. 4a7b, which may be a smaller representation if there is a large amount of adjacent repeated information. While real-world use cases for such a naïve compression scheme aren’t abundant, the algorithm is straightforward and can be implemented in a dozen lines or so in most languages. If you’ve got regexes or similar libraries at your disposal, you can manage even fewer lines. In Haskell’s case, one:

rleMap l = map (\e -> (head e, length e)) (group l)

which converts a string (or any arbitrary list of items) into a list of tuples, each of which has the character and its count. The function has type

rleMap :: (Eq a) => [a] -> [(a, Int)]

Simple and easy. But where’s the fun in calling it quits now? Let’s MapReduce our RLE algorithm to make it easier to parallelize and potentially Hadoop-friendly. We’ve already got our map function, so lets create a reduce:

rleReduce :: [(Char,Int)] -> [(Char,Int)] -> [(Char,Int)]
rleReduce [] [] = []
rleReduce a  [] = a
rleReduce [] b  = b
rleReduce a b
          | (fst $ last a ) == (fst $ head b) =
                 init a ++  [(fst(last(a)),snd(last(a)) + snd(head(b)))] ++ tail b
          | otherwise = a ++ b

This is a less common component of RLE implementations (I haven’t spotted this particular bit of code anywhere else, so there’s likely room for improvement), but no less straightforward: simply join two RLE‘d lists together if their tail and head are not the same character; if they are, merge the head and tail tuple (updating the count) and combine the rest of the list as normal.

Now, it’s simply a matter of splitting the RLE target into pieces, maping over pieces, and reducing them back into a cohesive RLE-encoded document:

splitRLE n s = foldl rleReduce [] $ map rleMap $ chunkn n s

(chunkn is a simple hand-rolled routine that splits a string into n similar-sized pieces) As expected, splitting the list apart and recombining is needless overhead without parallelization:

# No splitting (rleMap s)
> ghc -O2 prle --make
> /usr/bin/time -f '%E' ./prle large.txt 1>/dev/null
0:02.68

# Nonparallel splitting (foldl rleReduce [] $ map rleMap $ chunkn n s)
> ghc -O2 prle --make
> /usr/bin/time -f '%E' ./prle large.txt 1>/dev/null
0:06.51

If we parallelize it using a simple parMap,

parallelRLE n s = foldl rleReduce [] $ (parMap rdeepseq) rleMap $ chunkn n s

we might expect some improvement:

# parallelRLE n s = foldl rleReduce [] $ (parMap rdeepseq) rleMap $ chunkn n s
> ghc -O2 prle --make -threaded -rtsopts

# Parallel map 1 core
> /usr/bin/time -f '%E' ./prle large.txt +RTS -N1 1>/dev/null
0:06.31

# Parallel map 2 cores
> /usr/bin/time -f '%E' ./prle large.txt +RTS -N2 1>/dev/null
0:08.50

# Parallel map 4 cores
/usr/bin/time -f '%E' ./prle large.txt +RTS -N4 1>/dev/null
0:11.00

Unfortunately, the bookkeeping and garbage collection overwhelm the problem very quickly, never achieving better performance.

I’m running the above on a randomly-generated 12MB text file, and no amount of coaxing could make the parallelized version do any better. While we could have written our RLE algorithm in plain C without much more trouble and not have encountered such performance obstacles, one does not simply parallelize C by swapping in a parMap either (see also: this). Thus, we deep-dive into some Haskell optimization to get a performant version.

There is one particularly painful bottleneck: Haskell list monads are not ideal for handling bulk data of the sort we need because Haskell’s String type is represented as a [Char]. Since there’s no reason to use a boxed linked list just to scan over characters, we instead turn to Data.ByteString for reading the input, and to Data.Sequence to handle the RLE-encoded tuples. Data.Sequence specifically removes the large penalty when concatenating the lists together in the reduce step, as adding to either end of a Seq is a constant time operation. This is in contrast to [], where only adding an element to a list head is constant time. Importing these

import Data.ByteString.Lazy.Char8 as BL
       (ByteString
       ,length
       , take
       , null
       , splitAt
       , group
       , head
       , pack
       , readFile)
import Data.Sequence as S

lets us rewrite our map

rleMap :: BL.ByteString -> Seq (Char,Int)
rleMap l = fromList $ P.zip (map BL.head c) (map (fromIntegral . BL.length) c)
       where
        c = BL.group $ l

and reduce

rleReduce :: Seq (Char,Int) -> Seq (Char,Int) -> Seq (Char,Int)
rleReduce a b = rleReduce' (viewr a) (viewl b)
             where
              rleReduce' EmptyR EmptyL = S.empty
              rleReduce' EmptyR _ = b
              rleReduce' _ EmptyL = a
              rleReduce' (rs :> r) (l :< ls)
                         | (fst r) == (fst l) =
                           (rs |> (fst(r),snd(r) + snd(l))) >< ls
                         | otherwise = a >< b

Optionally, Data.Sequence can be expressed with ViewPatterns. Rewriting with these in mind allows the new reduce to resemble the old one fairly closely:

{-# LANGUAGE ViewPatterns #-}
rleReduce (viewr -> EmptyR) (viewl -> EmptyL) = S.empty
rleReduce (viewr -> EmptyR) b = b
rleReduce a (viewl -> EmptyL) = a
rleReduce a@(viewr -> (rs :> r)) b@(viewl -> (l :< ls))
           | (fst r) == (fst l) =
             (rs |> (fst(r),snd(r) + snd(l))) >< ls
           | otherwise = a >< b

Now we finally define a new parallelRLE

parallelRLE :: Int -> BL.ByteString -> Seq (Char, Int)
parallelRLE n s = foldl rleReduce empty $ (parMap rseq) rleMap $ chunkn n s

and wrap it all up in a IO monad

main :: IO()
main = do
     [fileName] <- getArgs
     s <- (BL.readFile fileName)
     print (parallelRLE (numCapabilities) s)

With an improved algorithm and IO wrapper, it’s time for a more complete benchmark:

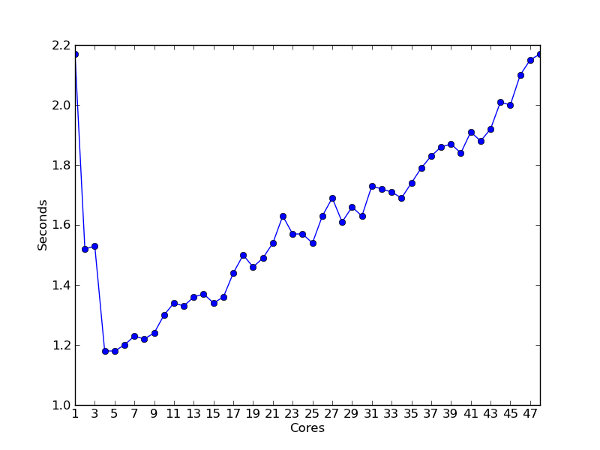
Performance Plot

This was run on a 0.5GB file, as the smaller 12MB file used above runs so fast that is essentially instant. Between 2 and 5 processors, we get a nicely ramped speedup. After 5 processors, the bookkeeping overhead rears its ugly head again reversing the trend, and around 48 processors (my system maximum), the parallelization ends up running as slowly as the unparallelized version. This is certainly not the end of possible optimizations, but we have to stop sometime.

While I’m no Haskell expert, parallelization which costs no more than swapping in a parMap and paying homage to the Big O gods is a very compelling reason to hammer out any other toy interview questions with Haskell in the future.

Get the code here. Feedback welcome.