2021 0009 0012

Building a Personal Dashboard in ClojureScript Part 3

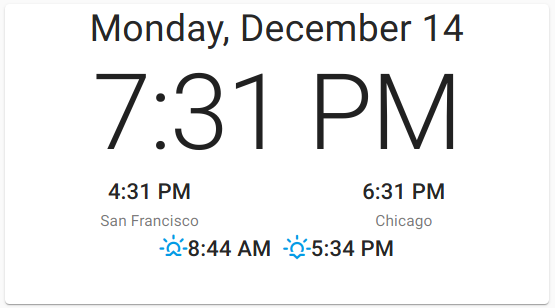
My raison d’être for creating the wall-mounted dashboard discussed in previous posts was to help with timing my transit connections when leaving my NYC apartment. After living on my block for a few months, I had worked out the perfect time to step out the door to make a subway, bus, or ferry connection, but quickly grew tired of having to pull out my phone to verify the transit time. I basically wanted an equivalent of the MTA transit time boards found in most subway stations, customized with my local stations.

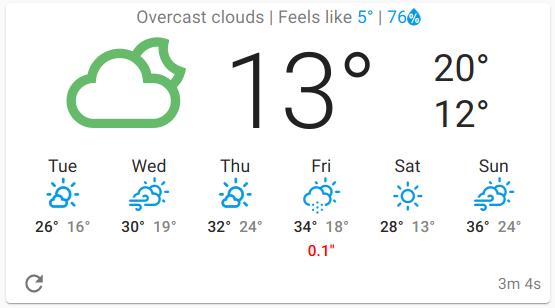
Jumping straight to a sample of the end result, I wanted a dashboard like this:

Sample transit card

Building this view, however, is less simple than it sounds. A big part of the complexity is in finding and consuming a source for the transit departure times. Unlike the weather card, there isn’t a single, free, purpose-built API to serve such dashboards. To deal with transit, we have to solve two main challenges:

  1. Finding a source for the transit data we need to display on the dashboard.

  2. Consuming transit data from the above source, stitching it together to populate the view.

For narrative reasons, we’ll take these points in reverse order before delving into the implementation.

Consuming Transit Data

The most common way to address (2) is by consuming a source that adheres to the GTFS (General Transit Feed Specification), the defacto standard for transit data that is published by many transit agencies. It has complementary static and realtime flavors, and we need both sources to get the most accurate data for our dashboard.

To better understand the complexity of GTFS, this is a (very rough) entity relationship diagram:

GTFS ERD

Note that there are other similar ERDs that are likely better-researched but didn’t fit quite as nealy into this post so I took a stab at creating this diagram myself. There are a few caveats in the image above: There are a lot of conditional relationships in GTFS that are not captured in this image; similarly, there are also a number of nested entities in the realtime spec that are glossed over in this diagram for simplicity.

GTFS is quite normalized so there isn’t an obvious self-contained single entity we can read that will let us drive everything in our dashboard. Combing through the GTFS entities, there is a sizable number that are not relevant to displaying transit times at a chosen station. Removing entities related to fare calculation, pathing, language translation, station layout, and so forth, the resulting trimmed-down ERD looks like:

GTFS ERD Small

This subset of the GTFS is a bit more manageable for demonstrating what we need to consume for our dashboard. The particular relevant subset might be different for other agencies (e.g., some agencies might rely more on frequency-based service or have calendar-based service changes) but this is all I needed based on the MTA GTFS.

Exploring this subset in more detail, the agency entity isn’t strictly necessary except in cases where the feed represents multiple agencies. To populate the dashboard, we will identify one or more stops, use these stops to filter the stop times list which allows us to compute the arrival times at a given stop. This would be sufficient for our dashboard if there’s a single transit line going in a single direction at a given stop. However, if there’s multiple routes or directions of travel at a particular stop then we need to split the stop times into groups by direction and route to differentiate them. To accomplish this, we additionally look up the trip for each stop time which gives us information about the trip direction, and then walk through trips to routes which allows us bucket the stop times into groups by route.

So far, we’ve only touched the entities in the static GTFS, which is sufficient if the agency consistency runs on time (🤣). To bring the prescheduled stop times into alignment with reality, we read the trip updates Realtime source and (hand-waving a lot here) update the stop times with these realtime updates at a reasonable interval.

At a high-level, this is our roadmap for reading the subset of the GTFS that we need for this dashboard.

Serving Transit Data

Stepping backwards to address point (1) above, we need to talk about how we physically convey GTFS data into our web application. The static portion of the GTFS is a zip file containing .txt files (effectively CSV formatted)–not impossible to download directly from the transit agency into a web application with the right decompression and parsing libraries, but hardly idiomatic. The GTFS Realtime format is even more challenging as it is serialized as a Protocol Buffer. It might be theoretically possible to consume the realtime ProtoBuf stream by providing the .proto file to the browser and using a ProtoBuf javascript decoder; in practice, the real-time updates from the MTA are megabytes-to-gigabytes and are updated frequently enough that I had concerns as to whether a cheap, wall-mounted tablet would be able to handle parsing the feeds in-browser at a reasonable frequency.

Thankfully, there are multiple server-side options available which vary in quality, completeness, and implementation language. Choosing a minimal GTFS server could absolutely work for this use case, but I ultimately ended up gravitating towards the Open Trip Planner (OTP) project which specializes in route planning (including surface street connections using OpenStreetMap). Not only does OTP consume GTFS (both static and realtime) for use in its route planning, it caches the serialized results for faster reloading, has a fetching mechanism to pull the feeds in at a regular cadence, and–most importantly for our intended application–has an Index API which provides a REST interface to query GTFS entities. Even better, it is becoming increasingly common for transit agencies themselves to host an OTP instance for their route planning or transit time needs–if such an instance is public-facing, using it saves a lot of work configuring and hosting our own OTP instance.

The discussion from the previous section roughly translates to the following Clojure pseudocode to walk through the GTFS entities and collect a useful payload:

(defn stop-times
  [stop-id]
  (->> stop-id
       fetch-stop
       fetch-stop-times
       (map (fn [stop-time]
              (let [trip  (fetch-trip (:trip-id stop-time))
                    route (fetch-route (:route-id trip))]
                (assoc stop-time
                       :route route
                       :direction (:direction trip)))))))

Following this, we can concat all the stop-times from all the stop-ids together and do a (group-by #(select-keys % [:direction :route])) to bundle them into the rows displayed in the dashboard.

From the Index API, the following endpoints look promising to meet these needs:

stop /index/stops/{stop-id}
stop times /index/stops/{stop-id}/stoptimes
trip /index/trips/{trip-id}
route /index/routes/{route-id}

As it turns out, the Index API is able to flatten the trip into the stop entity (/index/stops/{stop-id}) for us in the scenario where the stop services a single line + direction. This does not initially sound like a very useful optimization for more complex transit systems that routinely have multiple routes traveling multiple directions that stop at the same station. However, in the case of the MTA’s GTFS, the agency choose to model stations hierarchically, where the main station is the parent stop and different lines+directions are child stops within the same overall station. The Index API also directly adds the route-id to the individual stop times (i.e., it traverses the stop-time -> trip entities for us). Thus by choosing these “child” stops that represent a single line + direction, we can save having to make the additional trip call to get the direction + route ID. Under this optimization assumption we get an even trimmer effective ERD:

GTFS ERD Smaller

Depending on your particular agency, this optimization may not be applicable or might be overkill if you’re hosting your own OTP and don’t have any concerns about the number of API queries. If self-hosting, this might be a good candidate for the BFF pattern, but the rest of this post assumes a preexisting OTP instance without any extra server-side components on top of it.

Implementation

Now that we’ve settled on the physical API to use and know the relationships among the entities we need for our dashboard, all we have left is to code and style it. Rather than go line-by-line as in previous installments, I’ll only be going over the highlights of the source code in this section.

As with other external APIs we need to hit, we use re-frame-http-fx for defining the “effect handlers” that made the side-effecting REST calls. An example where we fetch the stop-times (assumes that the stop has already been fetched and is passed as input):

(re-frame/reg-event-fx
 ::fetch-stop-times
 (fn [_ [_ {:keys [stop-id] :as stop}]]
   {:http-xhrio
    (merge
     otp-request
     {:uri        (str config/otp-uri
                       "/routers/default/index/stops/"
                       stop-id
                       "/stoptimes")
      :on-success [::persist-stop-times [:transit :stop-times stop]]
      :on-failure [::events/http-fail [:transit :stop-times stop]]})}))

The notable part of this effect handler is the ::persist-stop-times event which is dispatched when the effect handler is successful. The ::persist-stop-times event is, itself an effect handler that persists the stop-times API payload into the re-frame.db/app-db while also fanning out (:dispatch-n) to trigger ::fetch-route events for all the new route-ids that it finds:

(re-frame/reg-event-fx
 ::persist-stop-times
 (fn [{:keys [db]} [_ key-path stop-times]]
   (let [existing-route-ids (-> db :transit :routes keys set)
         new-route-ids      (->> stop-times :route :id set)
         ;; diff what is in the DB with the newly-seen routes so we
         ;; only fetch them once
         route-ids          (->> (difference new-route-ids
                                             existing-route-ids)
                                 (remove nil?))
         stop-id            (-> key-path last :stop-id)]
     {:db         (assoc-in db key-path stop-times)
      ;; fire requests for the routes listed in the payload
      :dispatch-n (map (fn [route-id]
                         [::fetch-route route-id])
                       route-ids)})))

The route-fetching events are fired after fetching the stop times because the routes that serve a particular stop might change at any given point so we don’t necessarily know all the routes ahead of time. And it would be better not to have to preemptively fetch every route in the system, particularly for larger agencies like the MTA. We also want to avoid re-fetching the same routes over and over again, so route-ids that are already present in the app-db are not fetched again to minimize API queries, effectively treating the app-db as a cache.

How the stop and route entities are persisted is less interesting so I’m omitting examples of them here. Just like the weather API prior, we now need only to poll the transit API at regular intervals to make sure our app-db always has fresh information ready for display.

Like other re-frame applications, now that we have our events defined we need to create subscriptions on the resulting app-db changes to turn these raw OTP Index API payloads into a processed form ready to be used by our view. Our “Level 1” subscriptions are fairly simple:

(re-frame/reg-sub
 ::stop-times-raw
 (fn [db _]
   (-> db :transit :stop-times)))
;;; Repeat for stops and routes...

which fetches the raw API payload for the stop-times, which looks something like this:

[{:route {:id "MTASBWY:1"}
  :times
  [{:departureDelay     0
    :stopName           "South Ferry"
    :scheduledDeparture 89130
    :stopId             "MTASBWY:142N"
    :directionId        "0"
    :serviceDay         1592539200
    :tripId             "MTASBWY:5953"
    :realtimeDeparture  89130
    :stopHeadsign       "Uptown & The Bronx"
    :tripHeadsign       "Van Cortlandt Park - 242 St"}]
    ...}
 ...]

Note the realtimeDeparture field which is updated by OTP with the GTFS Realtime source. This payload goes through a cleanup subscription that grabs specific keys from the payload, places them into a flattened data structure, and converts the fixed departure timestamp into a “minutes from now” format that we’ll want in our view:

(re-frame/reg-sub
 ::stop-times
 :<- [::stop-times-raw]
 :<- [::clock/clock]
 (fn [[stop-times clock] _]
   (let [now (time-coerce/from-date clock)]
     (->> stop-times
          vals
          (apply concat)
          (mapcat
           (fn [{:keys [times route]}]
             (->> times
                  (map #(assoc % :route route))
                  (map
                   (fn [{time           :realtimeDeparture
                         day            :serviceDay
                         stop-id        :stopId
                         {route-id :id} :route
                         direction-id   :directionId}]
                     {:minutes        (-> time (+ day) (* 1e3)
                                          time-coerce/from-long
                                          (->> (safe-interval now))
                                          time/in-seconds
                                          (/ 60)
                                          js/Math.ceil)
                      :stop-id        stop-id
                      :route-id       route-id
                      :direction-id   direction-id})))))))))

This subscription code is detailed and has some assorted helpers (safe-interval, the cljs-time namespaces) that are significant but not worth a tangent right now. As before, I’m also omitting similar cleanup subscriptions for the stop and route payloads.

Finally, we join all three of stops, stop-times, and routes together with a 3rd-level subscription:

(re-frame/reg-sub
 ::stop-times-processed
 :<- [::stop-times]
 :<- [::routes]
 :<- [::stops]
 (fn [[stop-times routes stops] _]
   (->> stop-times
        (filter (-> (every-pred nat-int? (partial > 60))
                    (comp :minutes)))
        (map (fn [{:keys [stop-id route-id] :as stop-time}]
               (-> stop-time
                   (assoc :stop (get stops stop-id))
                   (assoc :route (get routes route-id)))))
        ;; Make this an inner join
        (filter (every-pred :stop :route))
        ;; Group by stop only
        (group-by #(select-keys % [:stop]))
        ;; Add route to key after grouping to keep routes together
        (map (fn [[k v]]
               [(assoc k :route (roll-up-route v))
                v]))
        (into {})
        (map-vals #(->> %
                        (filter
                         (fn [{:keys [direction-id]
                               {stop-direction-id :direction-id} :stop}]
                           (or
                            (= direction-id stop-direction-id)
                            (nil? stop-direction-id))))
                        (sort-by :minutes)
                        (take 4)))
        (sort-by (juxt (comp :sort-override :stop first)
                       (comp :sort-order :route first)
                       (comp :stop-id :stop first))))))

This is a lot to unpack, especially compared with the pseudocode above (which probably means this code needs some refactoring into more subscriptions); out of laziness, I’ll just summarize the highlights:

  • Keep only stop-times that are less than 60 minutes out
  • The stop and route are attached to the stop-time with an inner join
  • Group all stop-times by the different stops they represent
  • Do a “roll up” of all the routes attached to the stop times inside of each group with the roll-up-route function, which lets us show a stop, say Lex/63rd, as a single row labeled “F/Q” rather than having separate rows for the F and Q lines. This is typically more useful for express lines or other situations where you care only about the latest departure but don’t care about the particular line.
  • Filter out mislabeled stop times going the wrong direction at a stop
  • Sort the stop times in each group in ascending order
  • Take the first four stop-times in each group to show in the view
  • Sort the groups themselves

We now have a stable, easy-to-consume set of groups corresponding to all the stops we care about, each with up to four upcoming departure times in minutes.

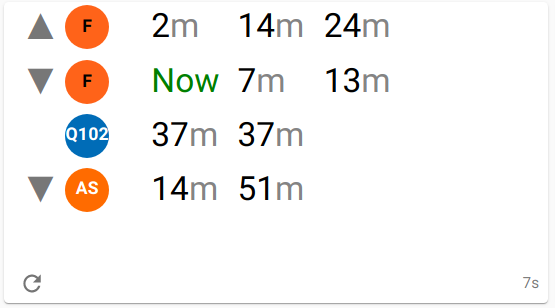
This payload is subsequently rendered in the view. Recall that we want a series of rows in our view that look like:

Transit row

where the arrow specifies the direction of travel, the round symbol specifies the particular route name, and the stop times fan out to the right. This is rendered with:

(defn transit []
  [:> Card {:height "48vh"}
   [:> CardContent
    [:> Grid {:container true :spacing 1 :alignItems "center"}
     (map
      (fn [[{{:keys [color text-color short-name route-id]} :route
             {:keys [direction-id stop-id]} :stop}
            stop-times]]
        ;; Since this element is being dynamically generated, must
        ;; specify key so React can do its reconcilliation
        [:<> {:key (str stop-id "-" route-id)}

         ;; Arrow pointing up or down corresponding to the direction
         [:> Grid {:item true :xs 1}
          [:> Typography {:variant "h4" :color "textSecondary"}
           (get direction-id->arrow direction-id "")]]

         ;; Line symbol that takes its color directly from the
         ;; transit agency's route metadata
         [:> Grid {:item true :xs 2}
          [:> Avatar {:style {:background-color (str "#" color)
                              :color (str "#" text-color)}}
           short-name]]

         ;; Render the stop
         (->> (concat stop-times (repeat nil))
              (map-indexed
               (fn [idx {:keys [minutes] :as stop-time}]
                 [:<> {:key idx}
                  [:> Grid {:item true :xs 2}
                   (when stop-time
                     [:> Typography
                      [:span
                       (if (> minutes 0)
                         [:<> minutes [:span "m "]]
                         "Now ")]])]]))
              (take 4))

         [:> Grid {:item true :xs 1}]])
      @(re-frame/subscribe [::transit/stop-times-processed]))]]])

This is another beast of a function (and I omitted some styling just to trim it down this small), but broken down is not too complicated: The outer map generates a row where each row consists of the up/down arrow and a circular Avatar symbol with the line short-name to display the route. The inner map-indexed generates exactly 4 stop times (or empty Grid items to pad out the grid).

Conclusion

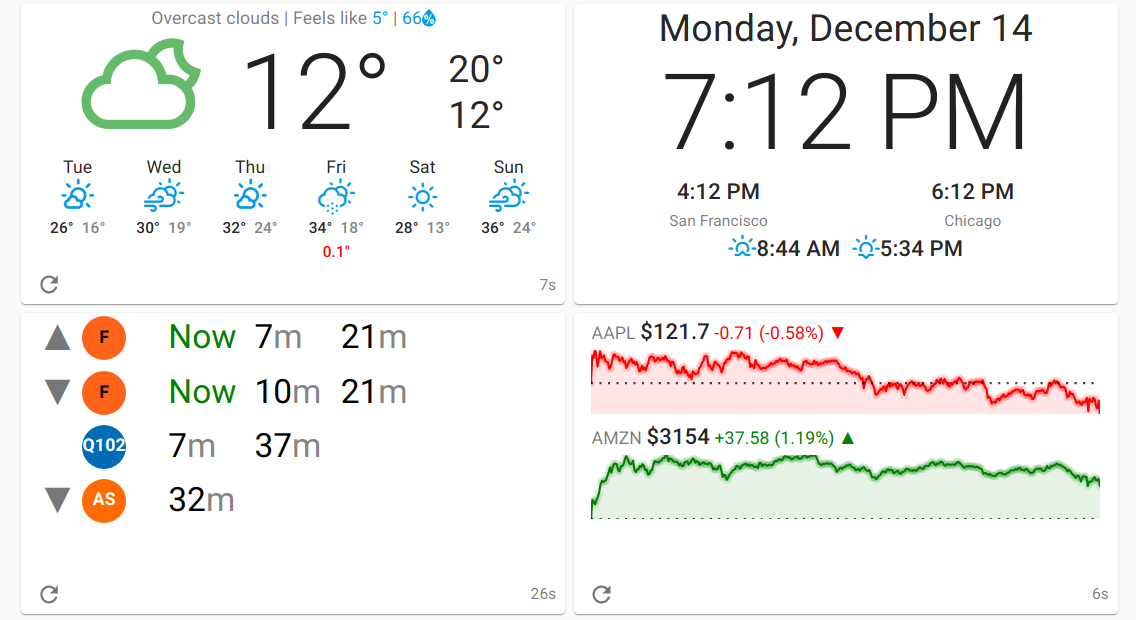
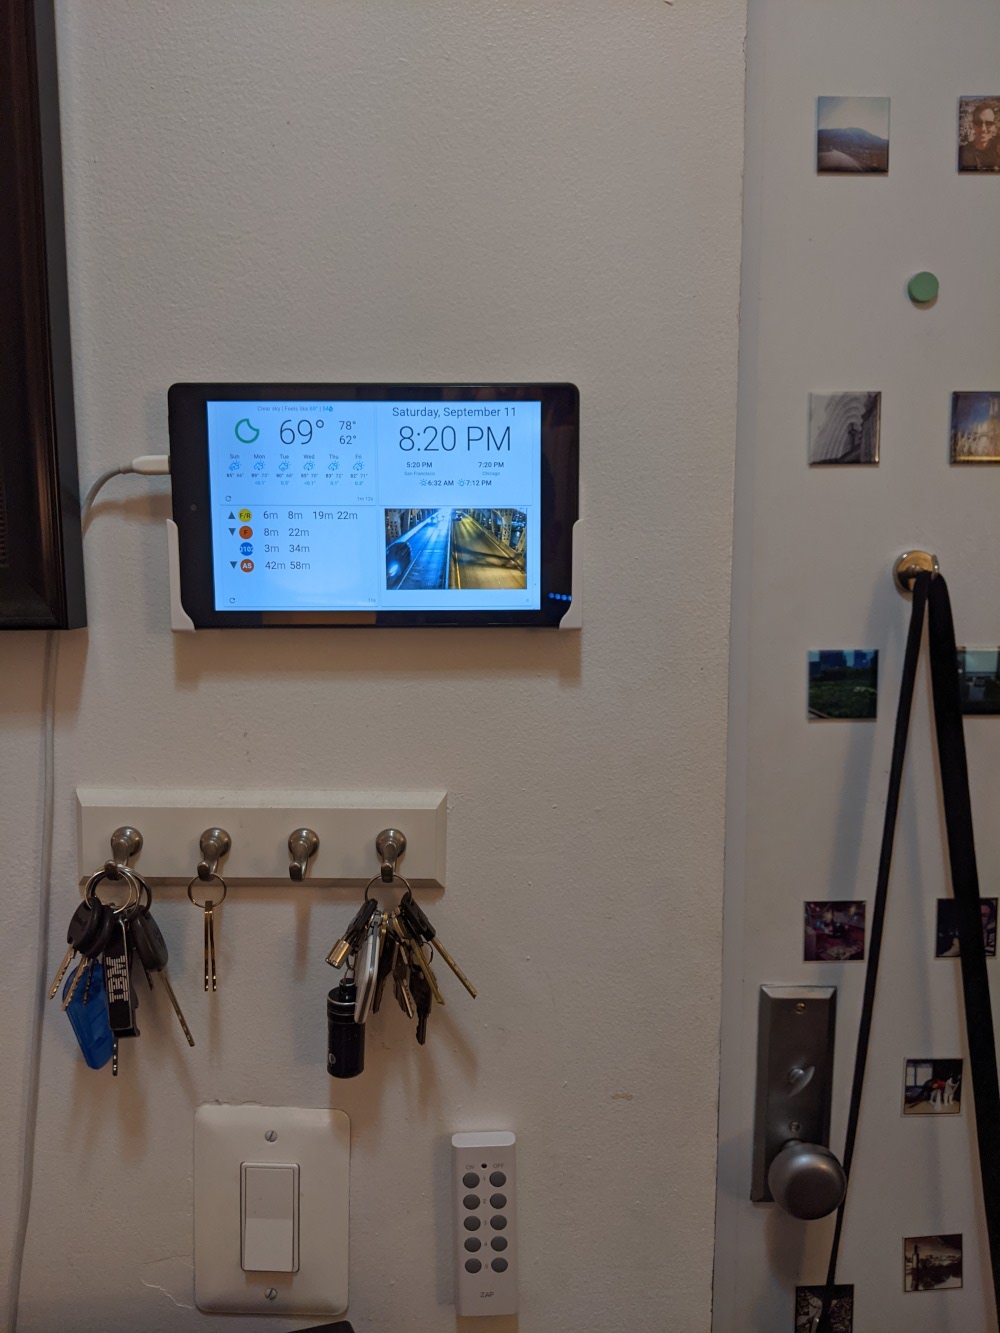
Since this the final post in the series, I would be remiss not to include some photos of the finished product:

Wall-mounted dashboard Wall-mounted dashboard with door

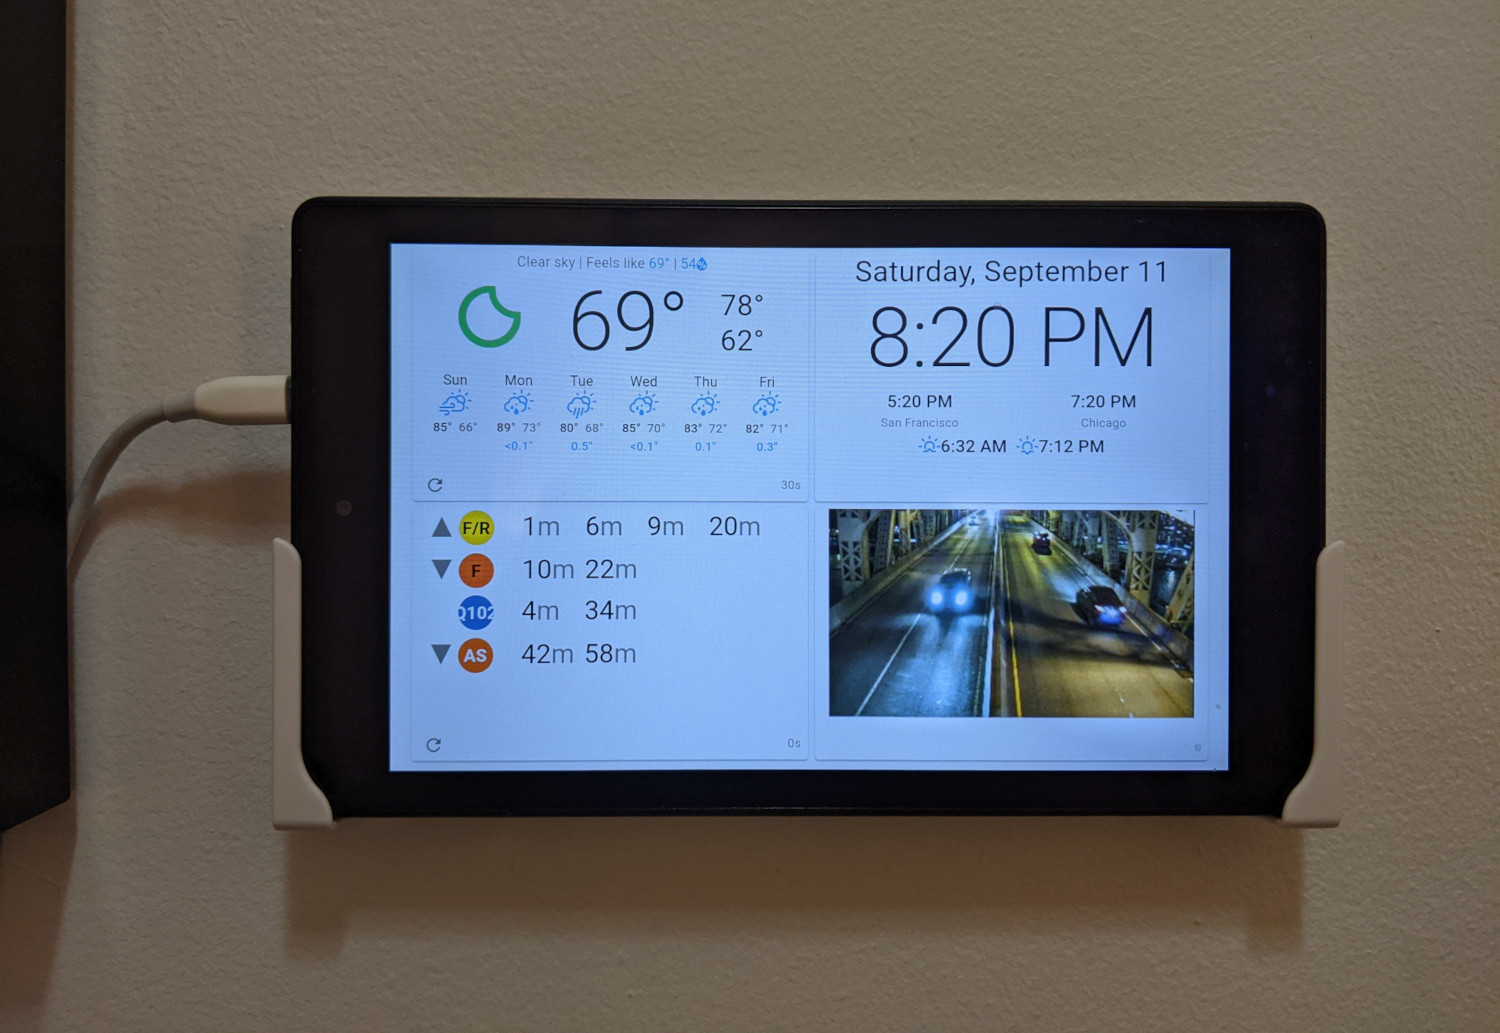
Differing slightly from the first installment, I’ve since replaced the stock chart in the lower right with a webcam view from NYC DOT but kept the appearance otherwise unchanged.

The dashboard is displayed on an inexpensive, previous-generation Amazon Fire 8 using the WallPanel app (having switched away from Fully Kiosk for this open-source option) to keep the ClojureScript SPA running continually. To physically affix the tablet to the wall, I purchased a tablet wall mount which adheres using Command Strips. A wall-colored Micro USB cable to keep the tablet charged completes the installation.

So far, this setup has been working well. There are some minor annoyances with the hardware: This particular Fire tablet does not make ambient light adjustments to the screen brightness so it lightens my living room considerably at night. Given that this tablet is a full order of magnitude cheaper than the premium tablet options, it has been more than sufficient for this purpose and I won’t be overly upset by battery or screen burn-in issues long-term.

Part 1 Part 2 Part 3

2021 0007 0009

Building a Personal Dashboard in ClojureScript Part 2

Following the previous installment in my series on building a dashboard in ClojureScript, I’ll be diving into the weather card.

Weather card

Like any re-frame application, this comes in two major pieces: consuming from the API to update the application state, and rendering the state on the page. Before showing how this is wired up, however, let’s first dive into the external weather API itself.

Weather API

There are several different weather APIs with a free tier that can handle the minimal traffic of a single dashboard. I landed on Open Weather Map API, which has both a free tier and an easy-to-use one call endpoint containing all the weather granularity (current and day/hour/minute-level) needed for a reasonable dashboard.

A sample request (with lots of fields omitted):

> curl 'http://api.openweathermap.org/data/2.5/onecall?lat=<latitude>&lon=<longitude>&units=imperial&appid=<apikey>' | jq .

{
  "current": {
    "dt": 1625517908,
    "sunrise": 1625477417,
    "sunset": 1625531408,
    "temp": 82.31,
    "feels_like": 84.31,
    "pressure": 1017,
    "humidity": 57,
    "weather": [
      {
        "id": 800,
        "main": "Clear",
        "description": "clear sky",
        "icon": "01d"
      }
    ]
    ...
  },
  "daily": [
    {
      "dt": 1625504400,
      "sunrise": 1625477417,
      "sunset": 1625531408,
      "temp": {
        "day": 83.12,
        "min": 66.2,
        "max": 83.82,
        "night": 75.74,
        "eve": 81.82,
        "morn": 67.89
      },
      "feels_like": {
        "day": 83.86,
        "night": 76.21,
        "eve": 83.5,
        "morn": 68.29
      },
      "humidity": 49,
      "weather": [
        {
          "id": 500,
          "main": "Rain",
          "description": "light rain",
          "icon": "10d"
        }
      ],
      "rain": 0.53,
      ...
    },
    ...
  ],
  "minutely": [...],
  "hourly": [...],
  "alerts": [...]
}

In addition, we’ll want to tie the payload to a set of weather icons supplied by the Weather Icons font together using this mapping (represented below as id->icon).

API Client

In re-frame parlance, we use an “effects handler” to make http calls, which is helpfully provided by re-frame-http-fx. This allows us to define a ::fetch-weather event analogous to the curl command above:

(re-frame/reg-event-fx
 ::fetch-weather
 (fn [_ _]
   {:http-xhrio
    {:method :get
     :uri    "http://api.openweathermap.org/data/2.5/onecall"
     :params {:lat   (:lat config/home)
              :lon   (:lon config/home)
              :units "imperial"
              :appid config/open-weather-api-key}
     :response-format (ajax/json-response-format {:keywords? true})
     :on-success      [::events/http-success [:weather]]
     :on-failure      [::events/http-fail [:weather]]}}))

where the success and fail events are defined as:

(re-frame/reg-event-db
 ::http-success
 (fn [db [_ key-path result]]
   (assoc-in db key-path result)))

(re-frame/reg-event-db
 ::http-fail
 (fn [db [_ key-path]]
   (assoc-in db key-path {})))

We can trigger this event at regular intervals, similar to the clock card:

(defn init []
  ...
  (re-frame/dispatch
   [::poll/set-rules
    [{:interval                 900 ; 15 minutes
      :event                    [::weather/fetch-weather]
      :dispatch-event-on-start? true}]])
  ...)

The 15 minute interval is set such that the API’s free tier daily request limit is apportioned throughout the day with some headroom remaining.

Finally, it is customary to create a “level 2” extractor subscription to pull the payload back out of the application state even though it is largely a trivial subscription:

(re-frame/reg-sub
 ::weather
 (fn [db _]
   (:weather db)))

Getting the weather payload ensconced in re-frame.db/app-db with a basic extractor is but our first step. It would be awkward for our view to consume directly from the full API payload as it contains many elements that would need to be filtered out or ignored; it also has the disadvantage that re-frame would have to re-render the weather element every time the payload is fetched even for UI elements that do not need to change. Enter the “level 3” materialized view, which filters down the payload into meaningful units of work. In this case, these units are:

  • Sunrise and sunset time
  • Current conditions
  • 6 day forecast

The sunrise/sunset subscription is easy once we’ve defined the epoch->local-date helper (that uses cljs-time internally) to parse the times into an object:

(re-frame/reg-sub
 ::sun
 :<- [::weather]
 (fn [{{:keys [sunrise sunset]} :current} _]
   {:sunrise (-> sunrise epoch->local-date .toUsTimeString)
    :sunset  (-> sunset epoch->local-date .toUsTimeString)}))

The current conditions subscription is also relatively simple, involving some light formatting (some of which could arguably be pushed down to the view layer):

(re-frame/reg-sub
 ::conditions
 :<- [::weather]
 (fn [{{humidity                :humidity
        feels-like              :feels_like
        current-temp            :temp
        [{:keys [description]}] :weather} :current
       [{:keys                [rain snow]
         {low :min high :max} :temp}]     :daily} _]
   {:humidity    (-> humidity (str "%"))
    :feels-like  (-> feels-like int (str "°"))
    :description (some-> description str/capitalize)
    :rain        (some-> rain mm->in (round-nonzero 2) (str "\""))
    :snow        (some-> snow mm->in (round-nonzero 2) (str "\""))
    :temp        (some-> current-temp int (str "°"))
    :low         (some-> low int (str "°"))
    :high        (some-> high int (str "°"))}))

This subscription plucks the current weather conditions from the payload (using the fancy destructuring that makes Clojure so effective) and returns a new, sparser map with the values formatted and ready to be used in a view.

The most complex subscription is the forecast, which involves processing the :daily list of elements and returning a new list of ready-to-template maps:

(re-frame/reg-sub
 ::forecast
 :<- [::weather]
 (fn [{forecast :daily} _]
   (->> forecast
        rest                            ; skip today
        (map (fn [{date                 :dt
                   {low :min high :max} :temp
                   rain                 :rain
                   snow                 :snow
                   [{icon-id :id} & _]  :weather}]
               {:epoch   date
                :weekday (-> date
                             epoch->local-date
                             .getWeekday
                             number->weekday)
                :icon    (id->icon icon-id)
                :high    (some-> high int (str "°"))
                :low     (some-> low int (str "°"))
                :rain    (some-> rain mm->in (round-nonzero 1) (str "\""))
                :snow    (some-> snow mm->in (round-nonzero 1) (str "\""))}))
        (take 6))))

This is similar to the current conditions subscription above; the major change here is that we are maping over the list of forecasts and taking only a fixed number of them.

This wraps up the event/subscription handling; with this code, we now ingest from the API and have defined a graph of subscriptions that whittles the payload down into filtered chunks that are ready to be placed into our view.

Weather Card

Creating views like the weather card is as much as art as it is an engineering effort, and I don’t expect I’d win any awards for either aspect.

Like any normal Clojure function, breaking our view into smaller pieces will greatly aid readability:

(defn weather []
  [:> Card
   [:> CardContent
    [weather-description]
    [weather-conditions]
    [weather-forecast]]])

Like the previous installment, the view uses uses the Material-UI react framework (i.e., the Card, CardContent components and many more) which comes with much saner style defaults than any CSS I could cook up.

(defn weather-conditions []
  [:> Grid {:container true :justify "center"}
   [:> Grid {:item true :xs 3}
    [:> Typography {:variant "h1"}
     ;; Display a large icon of current conditions
     [:i {:class (str "wi wi-"
                      @(re-frame/subscribe [::weather/icon]))}]]]
   [:> Grid {:item true :xs 5}
    [:> Typography {:align "center" :variant "h1"
                    :display "inline"}
     ;; Large view of the current temperature
     (:temp @(re-frame/subscribe [::weather/conditions]))]]
   [:> Grid {:item true :xs 2}
    (let [{:keys [low high]}
	     @(re-frame/subscribe [::weather/conditions])]
      [:> Typography {:align "right" :variant "h4"}
       high [:br] low])]])

With some minor extra styling, we end up with a nice, large display of the current temperature:

Current weather

Like the companion subscription, the forecast view maps over the individual days in the subscribed output to produce, in this case, Grid items to fill the card:

(defn weather-forecast []
  [:> Grid {:container true}
   (map
    (fn [{:keys [epoch weekday icon high low rain snow]}]
      ^{:key epoch}
      [:> Grid {:item true :xs 2}
       [:> Typography {:key epoch
                       :variant "body1"
                       :align "center"}
        weekday]
       [:> Typography {:align "center" :variant "h5"}
        [:i {:class (str "wi wi-" icon)}]]
       [:> Typography {:align "center" :variant "subtitle2"}
        high
        (gstring/unescapeEntities "&#8194;")
        low
	    (when rain
          [:<> [:br] (list " " rain)])
        (when snow
          [:<>
            (list " " snow)])]])
    @(re-frame/subscribe [::weather/forecast]))])

When generating view elements dynamically, specifying the key is important for re-frame (and React under-the-hood) to reliably match up elements that must be re-rendered when the payload changes. This gives us our 6-day forecast (which is all I could fit on the card even though the API returns more data):

Weather forecast

Last but not least, having a general text description of the weather is handy to capture leftover details that do not appear elsewhere in the UI:

(defn weather-description []
  (let [{:keys [humidity feels-like description rain snow]}
        @(re-frame/subscribe [::weather/conditions])]
    (->> [{:content description :render? description}
          {:prefix "Feels like " :content feels-like :render? true}
          {:content humidity :render? true}
          {:postfix " rain" :content rain :render? rain}
          {:postfix " snow" :content snow :render? snow}]
         (map (fn [{:keys [prefix postfix content render?]}]
                (if render?
                  (->> [prefix content postfix] (remove nil?) vec)
                  [])))
         (remove empty?)
         (interpose [" | "])
         (apply concat [:> Typography {:align "center"
                                       :color "textSecondary"
                                       :variant "body1"}])
         vec)))

This function is more elaborate than it needs to be, but is handy for adding new things to appear in the description–it first converts the individual datapoints into a vector of maps that (depending on the value of the :render? key) are subsequently concatenated into a |-separated series of descriptions:

Weather description

The full working code is available in weather.cljs and views.cljs which include a few extra visual tweaks and custom React components. Also omitted from the code in this post are a few visual details from the screenshot above, including the “refresh” button that triggers the ::fetch-weather event on-demand and the timer in the corner showing how much time has elapsed since the last fetch–not essential features for everyday use, but valuable for debugging.

With luck, the next post in this series will get to my favorite part of the dashboard: the transit card.

Part 1 Part 2 Part 3

2020 0012 0027

Building a Personal Dashboard in ClojureScript

After the 100th time checking the weather or looking up transit times before heading out the door in the morning, I came to the realization that having a tablet mounted near my front door with relevant information would be useful. In anticipation of venturing outdoors more regularly in a post-vaccine world, I decided to build a personal dashboard as my pandemic project.

There is a good deal of prior art in this space, from the Magic Mirror Raspberry-Pi-deployed dashboard intended to be embedded in a DIY mirror, to customizable iPad apps that have all the common personal dashboard features out-of-the-box. For my part, I wanted to balance the customizability of a DIY project with the lightweight-ness of a solution that runs entirely on a tablet. I specifically wanted to customize the particular APIs used, including some less common sources like local transit times. Though I make no claims to being a frontend developer, I expect it is uncontroversial to say that a backend-less SPA is among the more lightweight options in the web application space. And my go-to for building frontend applications is ClojureScript.

This series of posts will walk through the creation of cockpit, the ClojureScript SPA I now have mounted on my wall. Before getting to specifics, let’s look at the final dashboard:

Full dashboard view not guaranteed to make sense

Some highlights:

  • The dashboard is divided into “Cards” using a responsive grid layout with primitives from Material-UI.

  • Data for each card is polled at a regular interval with a timer in the bottom of each card showing the time elapsed since the data was last fetched and a “refresh” button to fetch the data right away.

  • The weather card is sourced from the Open Weather Map API with icon styling provided by the Weather Icons font. It includes typical low/high, forecast, and precipitation information.

  • The clock card is self-explanatory–the time is obtained from a plain Javascript Date() call which returns the system date/time in the local timezone.

  • Stock data is pulled from the IEX Cloud API and styled with react-sparklines.

  • The transit card contains rows with arrival times at a transit stop (arrows indicating cardinal direction at the stop). The data source here is an Open Trip Planner instance loaded with the GTFS feeds from the particular transit agency in question.

  • The compiled dashboard is physically hosted from my home router and is displayed on an inexpensive Amazon Fire 8 tablet with the Fully Kiosk app.

There are loads more details that go into a card–each is effectively its own mini application. This post will primarily cover the skeleton of the dashboard and the bare-bones clock card; I’ll aspirationally follow-up with future posts to explore the other cards in the dashboard.

Dashboard Skeleton

In the ClojureScript SPA space, there are several stand-out React wrappers vying for dominance. For this project, I chose re-frame since the learning curve for a small-scale project was lighter than Fulcro. Rather than wire all the various libraries, build tools, and debugging utilities together manually, the re-frame-template makes it easy to get started. This

lein new re-frame cockpit +10x +cider +kondo +test

is basically how I seeded the repo. The biggest opinion imposed in the template aside from re-frame itself is shadow-cljs as the build tool.

With a skeleton project in hand, let’s wire up the views. Dipping our toes into Material UI requires adding it as a dependency to src/cljs/deps.edn:

{:npm-deps {"@material-ui/core"  "4.9.13"
            "@material-ui/icons" "4.9.1"}
 ...}

which will instruct shadow-cljs to fetch the dependencies through npm during the build.

The src/cljs/<project>/views.cljs file is where the “Hello World” main-panel lives. Thanks to the magic of shadow-cljs, we can require the React components directly into the cockpit.views namespace as if they were native ClojureScript code:

(ns cockpit.views
  (:require
   [re-frame.core :as re-frame]
   ["@material-ui/core/Card"        :default Card]
   ["@material-ui/core/CardContent" :default CardContent]
   ["@material-ui/core/Container"   :default Container]
   ["@material-ui/core/Grid"        :default Grid]
   ["@material-ui/core/CssBaseline" :default CssBaseline]
   ["@material-ui/core/Typography"  :default Typography]))

With this in place, we can modify the main-panel with our Material UI Grid components:

(defn main-panel []
  (let [card-opts {:item true :xs 12 :sm 12 :md 6  :lg 4}]
    [:> CssBaseline
     [:> Container {:maxWidth false}
      [:> Grid {:container true :spacing 1}
       [:> Grid card-opts [weather]]
       [:> Grid card-opts [clock]]
       [:> Grid card-opts [transit]]
       [:> Grid card-opts [stocks]]]]]))

The :> shorthand adapts React components into Reagent components. weather, clock, transit, and stocks are functions that define the contents of each card. This gives us a blank slate to fill in our cards with content.

Clock Card

Clock card

The clock card consists of a header with the date, the current local time, a side-by-side view of the time in the US Central and Pacific time zones, and the sunrise/sunset times.

The clock view implementing this looks something like:

(defn clock []
  [:> Card
   [:> CardContent

    [:> Typography {:align "center" :variant "h4"}
     @(re-frame/subscribe [::events/day])]

    [:> Typography {:align "center" :variant "h1"}
     @(re-frame/subscribe [::events/time])]

    [:> Grid {:container true :spacing 0 :direction "row"
              :justify "center" :alignItems "center"}
     [:> Grid {:item true :xs 6}
      [:> Typography {:align "center" :variant "h6"}
       @(re-frame/subscribe [::events/time-pt])]
      [:> Typography {:align "center" :variant "body2"}
       "San Francisco"]]
     [:> Grid {:item true :xs 6}
      [:> Typography {:align "center" :variant "h6"}
       @(re-frame/subscribe [::events/time-ct])]
      [:> Typography {:align "center" :variant "body2"}
       "Chicago"]]]

    (let [{:keys [sunrise sunset]}
          @(re-frame/subscribe [::events/sun])]
      [:> Typography {:align "center"
                      :variant "h6"}
       [:i {:class "wi wi-sunrise"}]
       sunrise
       [:i {:class "wi wi-sunset"}]
       sunset])]])

which makes liberal use of the Typography Material-UI component along with a nested Grid component to show the ET/CT timezones side-by-side. The only missing pieces are some minor styling to fix the height of the Card so it fills the containing Grid.

Nested within the React components that make up the clock view are re-frame/subscribe functions which bind the view to re-frame subscriptions which are, effectively, listeners for re-frame events. Subscriptions and events are commonly defined in src/cljs/<project>/events.cljs. The clock events and subscriptions for the main time display are comparatively simple:

(re-frame/reg-event-db
 ::timer
 (fn [db _]
   (assoc db :clock (js/Date.))))

(re-frame/reg-sub
 ::clock
 (fn [db _]
   (:clock db)))

(re-frame/reg-sub
 ::time
 :<- [::clock]
 (fn [clock _]
   (.toLocaleTimeString
    clock
    []
    (clj->js {:hour "numeric" :minute "numeric" :hour12 true}))))

Subscriptions and events in re-frame are a complex topic, so this treatment will only begin to scratch the surface. In short, the ::timer event–when triggered–will update the :clock key in the application’s db state hash-map. The ::clock subscription defined with reg-sub is a “Layer 2” extractor subscription that does nothing but pluck the :clock key back out of the application db. The ::time subscription is a “Layer 3” materialized view of this extracted value (the :<- [::clock] adds the subscription dependency), converting it to a string that is ready to be inserted into the rendered view. Internally, re-frame chains these subscriptions into a graph, updating all the Layer 2 subscriptions when the db changes, and then updates only the changed Layer 3 subscriptions and their subscribed views, leaving everything else untouched.

The remaining subscriptions are left as an exercise to the reader with spoilers available (isolated to a dedicated namespace) in the clock.cljs file in the source.

To tie things together, we must continually trigger the ::timer event for our clock to receive updates and subsequently be re-rendered in the view. For this, we turn to re-pollsive, a library that lets us trigger events based on a fixed time interval. After adding the library dependency to the project.clj file, we initialize it in the src/cljs/<project>/core.cljs file to continually send the ::timer event:

(defn init []
  ...
  (re-frame/dispatch [::poll/set-rules
                      [{:interval                 1
                        :event                    [::events/timer]
                        :dispatch-event-on-start? true}]])
  ...)

An :interval of 1 will update our clock every second.

With all this in place, a lein dev will build and begin serving the application from localhost:8280, complete with hot-reloading to make iterating and tweaking the app seamless.

The next post in this series will dive into the Weather card, which involves our first external API calls.

Part 1 Part 2 Part 3

2019 0003 0014

Migrating to NixOS

After running Arch Linux for the last decade, I’ve finally made the jump to NixOS. For me, this means updating two VMs (VirtualBox and VMWare) and a bare-metal install (an aging MacBook Air).

I’ve repurposed my old config repo to store both my dotfiles as well as the NixOS configuration.nix files.

Since I was already making a big transition, I decided to take the opportunity to retool a few more things in my dev setup:

  Old New
OS Arch Linux NixOS
Shell Bash Zsh
Terminal urxvt Alacritty
Multiplexer screen tmux
Window Manager XMonad i3
Editor Emacs Emacs

I initially wanted to make the jump from X11 to Wayland, but NixOS isn’t quite ready just yet.

My goal for this writeup is to document the rationale for making the switch, capture the stuff I wish I had known before diving into the Nix language, and describe the particulars of how I organize my new setup.

Motivation

While I lack a single compelling reason to make the jump, there are a few pain points with my Arch setup that, together, pushed me to give NixOS a shot:

  • Falling behind on Arch changes. While I benefited a few times from Arch’s rolling update process, in practice I’ve rarely found it was something I needed. Not staying on top of Arch updates invariably leads to painful upgrades that take time to work through. Taking snapshots of my VMs reduced a lot of this upgrade risk, but it takes more time than I’m willing to spend to upgrade my bare-metal Arch install after neglecting it for extended periods.

  • Package drift among machines. Having my VMs get slightly different versions of packages from my Linux laptop, or forgetting to install the same set of packages across all machines was a minor but consistent annoyance. I kept a list of arch packages that I’d move from machine to machine, but nothing forced me to audit that the installed packages matched the list.

  • Limited local install options. I’ve grown reliant on Docker for infrastructural components (e.g. Postgres), but being able to install specific dev tools on a per-project basis (I’ve been playing with QGIS recently) is something I’ve constantly found painful, the few times I’ve bothered at all.

Nix

The big ideas behind the Nix ecosystem are covered in detail elsewhere; what was appealing to me in particular was Nix’s emphasis on reproducibility, file-driven configuration, and functional approach to its package repository, nixpkgs. You can think of the Nix package manager as a hybrid of apt-get and Python’s virtualenv with a sprinkling of git; you can use Nix to build multiple, isolated sets of packages on, say, a per-project basis, with the guarantee that Nix only needs to fetch (or build) shared dependencies once. Nix stores all built packages in the Nix store which serves as a local cache. Nix grafts together a collection of Linux directories (bin, usr, etc.) by symlinking the appropriate files contained in the packages that live in the Nix store. This isolated environment can be system-wide (in the case of NixOS), local to your user (nix-env) or tailed for a specific project (nix-shell).

nix-shell serves a few different roles in the Nix ecosystem, but one of those roles is to make dependencies defined in a “derivation” (Nix’s version of a makefile) available for use in a shell. These derivations are used to define a hermetically-sealed environment for building a package as well as collecting the commands to configure and run a build. We can re-use just the environment-prep part of a derivation along with nix-shell to drop us into a terminal that has exactly the packages we want. Here’s an example of a derivation for a TeX project:

with import <nixpkgs> {};

stdenv.mkDerivation {
  name = "my-document";
  buildInputs = with pkgs; [
    texlive.combined.scheme-full
  ];
  shellHook = "pdflatex document.tex"
}

With this derivation placed in shell.nix, running a nix-shell in the same directory will fetch the entirety of TeX Live (which is not small) and make all the related files, configuration, tools, fonts, commands, etc. available in the shell. It then uses one of these tools (pdflatex) to run the “build” of document.tex to generate a PDF. Writing a full derivation file isn’t necessary if you don’t need to be dropped into a shell for further work. The following is equivalent to the derivation above, but does not keep TeX Live available in the shell after it is done building the document:

nix run nixpkgs.texlive.combined.scheme-full -c pdflatex document.tex

I only rarely need TeX, so being able to make TeX available on a per-project basis without having all its commands pollute my PATH when doing non-TeX work is useful. Going further, I can mix-and-match versions of Python, the JVM, Postgres, etc. independently for each project I have without having to use sudo.

nixpkgs

While the Nix Expression Language is somewhat esoteric, the big ideas aren’t far removed from features in mainstream functional languages. nixpkgs in particular can be conceptualized as a single large map (called an Attribute Set or attrset in Nix) from keys to derivations:

{
  # <snip>
  tmux = callPackage ../tools/misc/tmux { };
  # <snip>
}

You can see a meaty example of nixpkg’s package list here. This would normally be an unwieldy thing to build in memory on every interaction with the package manager, however Nix lazily loads the contents of this attrset. Nix even provides the option to make these attribute sets “recursive” allowing the values to reference sibling keys, e.g.

rec { a = 2; b = a+3; }

nixpkgs provides facilities to change or update existing packages with custom configuration, and add new entries to the package attrset. It does this by way of “overlays” which are a fixed point over the package attrset. Nix’s approach of effectively rebuilding a facsimile of the FHS on every run means that “manual” intervention to install things outside of a package manager (say, copying a ttf font into /usr/share/fonts) is not feasible, so having an easy way to fold your own set of custom packages into the package attrset is vital.

The other important aspect to nixpkgs is that it is versioned in git (conveniently alongside NixOS in the same repo). The Nix CLI tools can fetch and install the latest set of packages by rolling the local clone of nixpkgs forward and then rebuilding your packages. Such a rebuild can apply to all the packages on your entire system, or just a particular derivation’s local packages. This can work the other direction as well: If you prefer your package set to remain completely fixed, you can pin the nixpkgs clone to a particular git SHA. Stable releases of NixOS are handled as branches of the nixpkgs repo, which do get critical updates but avoid all the bleeding-edge changes that the master branch has.

NixOS

NixOS goes a step further and utilizes attrsets to configure the OS itself. Not unlike application configuration (for which there are numerous libraries), NixOS defines your OS in a series of one or more attrsets that are merged together; unlike traditional configuration approaches that use a last-merged-wins strategy, however, NixOS’s properties provide per-field control over the priority of merges along with conditionals that control whether an option is merged or not.

This approach to OS configuration is useful for defining options amongst a set of similar but not identical OSs. For my NixOS config, I’ve created a base configuration.nix file that contains common options that I want set across all my machines (abbreviated example here):

{ config, pkgs, ... }:
{
  time.timeZone = "America/Chicago";
  environment.systemPackages = with pkgs; [feh vim wget];
  programs.zsh.enable = true;
  users.users.johndoe.shell = pkgs.zsh;
  # <snip>
}

I then import this common file into host-specific files that each contain options specific to that particular machine, e.g. a VM host:

{ config, pkgs, ... }:
{
  imports = [ ./configuration.nix ];
  services.vmwareGuest.enable = true;
  users.users.johndoe.shell = mkOptionDefault pkgs.bash;
  # <snip>
}

Note the mkOptionDefault function that reduces the priority of the pkgs.bash value from the default of 100 to 1500. Had I left off mkOptionDefault, NixOS would complain that johndoe.shell was declared twice. However, by reducing its priority, the configuration.nix’s definition of johndoe.shell = pkgs.zsh will take priority, despite it not being the “last” merged. In actuality, NixOS builds the configuration as a whole without any notion of ordering, and will fail loudly if it gets two property values with equal priority.

Notice above that the NixOS configuration includes option values that range from plain strings (e.g. time.timeZone) to more complex services that wire up nontrivial operations (schedule daemons to auto start, create systemd services, modprobe kernel modules, etc.). Unlike nixpkgs, NixOS doesn’t try to specify all these configuration options in a giant flat file; rather, it splits options into modules which keep options grouped into logical units. Modules let you create new options easily, as well at attach a meaning to each option by doing things such as configuring other module’s options, composing other modules together, writing files (also done through options, interestingly), and assorted other activities.

To introduce new options that vary among my work VMs and my personal laptop, I’ve written a custom NixOS module, which looks like

{config, pkgs, lib, ...}:

with lib;

{
  options = {
    settings = {
      username = mkOption {
        default = "malloc47";
        type = with types; uniq string;
      };
      email = mkOption {
        default = "malloc47@gmail.com";
        type = with types; uniq string;
      };
      # more options
    }
  }
}

This module lets me set a username for the machine being built, the keyboard layout I want to use, the email I want to use (for my git configuration), and many other options. I’ve written this module as a container of values for other modules to read, but takes no action itself (this is a trick so I can re-use the module for home-manger, discussed below). However, upon importing this module elsewhere, I can set or retrieve values for these options to parameterize the rest of my configuration. E.g.,

users.users.${config.settings.username}.shell = pkgs.zsh;

NixOS helpfully keeps a large index of all options across all modules defined in the base NixOS system, which is also available in man page form on an installed system:

> man configuration.nix

To utilize this declarative system configuration, NixOS provides the nixos-rebuild command which reads the configuration.nix file to find out what nixpkgs packages it requests, templates configuration files with the option values given, and eventually builds the entire file tree (as usual, symlinked back to the Nix store). NixOS persists every rebuild of your system as a sequentially numbered “generation,” which makes it easy to examine or roll back your entire system’s configuration to a prior state. These generations are listed in the bootloader, so if you break something in your most recent generation, you can boot into a prior generation to find out what went wrong.

home-manager

I’ve traditionally versioned my home folder’s dotfiles in a git repo and deployed it with a hand-rolled script. Using a lightweight window manager (formerly XMonad) means that significant portions of my UI configuration live in my dotfiles, and this has led to increasingly awkward workarounds to make this configuration portable across the different hosts I regularly use. One example is controlling the Linux HiDPI settings which are, to put it mildly, a mess. I specify a slew of font tweaks, scaling factors, and DPI settings among half a dozen dotfiles. This makes it difficult to port my dotfiles from one machine to another.

The formal Nix ecosystem doesn’t (yet) have a systematic approach for writing files directly to a home folder. It can place arbitrary files in an /etc folder. If you’re the sole user of your machine and the application you want to configure looks at an /etc directory, you could have NixOS write your dotfiles there and forego keeping them in your home folder at all. My use case unfortunately doesn’t fit neatly into these constraints; I have enough home-folder-only applications that an /etc-based approach isn’t viable.

The most Nix-native experience I’ve found for managing dotfiles is home-manager. It is not only written and managed via the Nix Expression Language, but it follows the same philosophy as the rest of NixOS. This includes a similar approach for splitting configuration into modules and, in fact, it supports importing my custom module mentioned above. Though home-manager can be run with a separate home.nix file and a home-manager CLI utility to trigger “rebuilds” of your home folder, it additionally exposes a NixOS module that can be used in a system-level configuration.nix file to rebuild your home folder following a system-wide rebuild. Being the sole user of my systems, having NixOS and home-manager work in lockstep is preferable for me.

home-manager encompasses more than just copying dotfiles to your home folder. Some broad use cases include:

  • Installing packages locally for your user
  • Placing dotfiles in your home folder
  • Generating dotfiles from a declarative configuration
  • Creating per-user systemd services (I use this for emacs --daemon, and it is quite handy).

It does all this by building a single package, home-manager-path, that includes all the configured local packages and dotfiles. It then installs this package into your local Nix environment (traditionally managed by nix-env). Similar to how the rest of Nix works, each dotfile is symlinked into your home folder from the home-manager-path package contained in the Nix store. This works similarly to how my old, hacky script managed my dotfiles.

The choice between having home-manager generate your dotfiles whole-cloth, or writing your dotfiles by hand is entirely up to you. If you’re like me and have pre-written dotfiles sitting around, it’s easy to re-use these by

home.file.".inputrc".source = ./.inputrc;

which insures that the .inputrc file in the same folder as the home.nix file is deployed to ~/.inputrc in your home folder. home-manager supports more complex parameters–my emacs configuration has too many files to enumerate explicitly, and home-manager can symlink the entire directory to my home folder, creating nested directories as necessary:

home.file.".emacs.d" = {
  source = ./.emacs.d;
  recursive = true;
};

home-manager lets me specify file contents directly inside of home.nix, which is useful if I want to reference options defined in the aforementioned custom module:

home.file."fonts.el" = {
  target = ".emacs.d/config/fonts.el";
  text = ''
    (provide 'fonts)
    (set-frame-font "${config.settings.fontName}-${toString config.settings.fontSize}")
    (setq default-frame-alist '((font . "${config.settings.fontName}-${toString config.settings.fontSize}")))
  '';
};

Since I’ve never had an extensive .tmux.conf file, I can use home-manger to generate it for me:

programs.tmux = {
  enable = true;
  terminal = "tmux-256color";
  shortcut = "u";
};

which creates a ~/.tmux.conf file with (among other contents):

set  -g default-terminal "tmux-256color"

# rebind main key: C-u
unbind C-b
set -g prefix C-u
bind u send-prefix
bind C-u last-window

The ability to have disparate applications with varied configuration languages wrapped by a single, type safe, functional meta-language is cool. If the idea of writing Nix code to generate your dotfiles is too weird, you can always fall back to having it symlink your hand-rolled dotfiles. If you prefer a hybrid, most home-manager modules have an extra option (or similar) to interleave arbitrary configuration in the dotfiles it generates.

Layout

My newly restructured config repo is now laid out with the following directories:

  • /nixos/configuration.nix : general OS configuration that applies to all hosts
    • Imports home.nix to build my home folder
    • Imports overlays from pkgs/
  • hosts/ : host specific configuration:
    • Imports hardware configuration from hardware/
    • Imports general NixOS configuration from nixos/
    • Imports custom modules from modules/
  • hardware/ : low-level configuration (file systems, kernel modules, etc.) for use by individual hosts
  • config/home.nix + dotfiles
    • Imports keyboard layout from xkb/
    • Imports custom modules from modules/
  • modules/ : my custom configuration module, and any future modules
  • personal/ : private git submodule for non-public dotfiles
  • pkgs/ : overlays for custom packages
  • xkb/ : keyboard layouts

To bootstrap a new host after doing a vanilla install of NixOS, I need to:

  1. Generate the appropriate hardware/ file (or re-use an existing one if the hardware matches).
  2. Customize a new host/ file, including the options defined in modules/settings.nix to match the needs of the new machine (e.g. set a work email or change the default font size for HiDPI screens).
  3. Following this, I generally symlink the host/<hostname>.nix file to /etc/nixos/configuration.nix so that NixOS rebuilds don’t have to be passed the file explicitly.
  4. Finally, running nixos-rebuild will construct the complete OS and my home folder with the exact set of packages and dotfiles I’ve defined for all of my machines.

Alternatively, I could inject the configuration into the machine prior to doing a NixOS install or even build a custom NixOS ISO that includes my configuration in the image. Since bootstrapping my configuration is only something I’ve had to do once per platform, I haven’t been compelled to optimize further yet.

Conclusion

So far I’ve been happy with my NixOS setup; I do miss the ease of the AUR and the extensively documented ArchWiki. Perhaps the most important change I’ve noticed is how much bolder I can be with toying on bare hardware; the few times I’ve messed up my system, I just boot back into the previous generation.

2015 0002 0016

Jetty JMX in Clojure

Embedded Jetty is one of the more popular servers for ring applications. JMX can be useful for poking around the guts of Jetty, as well as making runtime config changes. Unfortunately, enabling JMX for an embedded Jetty isn’t a straightforward config change, and the process for doing so in Clojure is largely undocumented. So this is the guide that I wish existed when I found the need to profile Jetty. If you’d rather skip the commentary, I’ve put up a minimal clojure jmx-enabled server for perusal.

Most essentially, the version of Jetty that comes bundled in ring-jetty-adapter is too old (currently 7.6.13) to expose meaningful JMX hooks. Thankfully there’s a modern ring adapter that you can add to your dependency list:

[info.sunng/ring-jetty9-adapter "0.8.1"]

which serves as a drop-in replacement for the official ring-jetty-adapter. Another relevant dependency is Jetty’s JMX artifact:

[org.eclipse.jetty/jetty-jmx "9.2.7.v20150116"]

The jetty-jmx version should match with the version of jetty-server provided by ring-jetty9-adapter.

While editing project.clj, it’s important enable JMX on the JVM level, and select a port:

:jvm-opts ["-Dcom.sun.management.jmxremote"
           "-Dcom.sun.management.jmxremote.ssl=false"
           "-Dcom.sun.management.jmxremote.authenticate=false"
           "-Dcom.sun.management.jmxremote.port=8001"]

Finally, the running Jetty server must opt-in to JMX by pointing to the appropriate “MBean,” which can be imported with:

(ns jetty-jmx.core
  (:require [ring.adapter.jetty9 :refer [run-jetty]])
  (:import (java.lang.management ManagementFactory)
           (org.eclipse.jetty.jmx MBeanContainer)))

The server can then be started with:

(let [mb-container (MBeanContainer. (ManagementFactory/getPlatformMBeanServer))]
    (doto (run-jetty app {:port 8000
                          :join? false})
      (.addEventListener mb-container)
      (.addBean mb-container)))

which attaches the MBean to the running Jetty server. Since the run-server command calls .start on the Server object before returning it, it’s important to configure :join? false to allow thread execution to continue, preventing the following .addEventListener and .addBean from being blocked.

With all of this, it should now be possible to start the server and connect to the JMX port using jconsole:

jconsole localhost:8001

Relevant info will be under the MBeans tab. Useful fields include

org.eclipse.jetty.util.thread.queuedthreadpool.threads

for how many threads are allocated, and

org.eclipse.jetty.util.thread.queuedthreadpool.queueSize

to find out how many requests are waiting on threads.